1. はじめに
2. サーバー構成
3. 設定手順
3.1. Nginxの設定
3.2. Pacemaker+Corosyncの設定(今回はここまで)
4. 今回の設定におけるPacemakerの動作
5. 手動フェイルオーバー手順
6. 想定する障害と具体的なPacemakerの動作
7. おわりに
1. はじめに
少し前に「負荷分散用途のNginxサーバーをPacemakerで冗長化する」サーバー構成を構築する機会がありました。
構築手順は、ほぼ、以下の記事のとおりです。
ありがとうございます!
(参考記事)
・NGINXの負荷分散装置をPacemakerで冗長化する – 技術メモメモ
https://tech-mmmm.blogspot.com/2022/06/nginxpacemaker.html
ここでは、構築の手順と、Pacemakerのリソース設定についての僕なりの解釈や、フェイルオーバーなど運用の注意点をまとめます。
長いので、前後編に分けました。
構築、操作手順は2023年4月時点のものです。
以下、2台のサーバーで、NginxやVirtual IPアドレスが稼働している状態を「アクティブ」、稼働していない待機状態を「スタンバイ」といいます。
2. サーバー構成
サーバーは2台で、基本情報は以下のとおりです。
- OS: Rocky Linux 8.7
- サーバー1のホスト名とIPアドレス: pm-test1, 192.168.1.101
- サーバー2のホスト名とIPアドレス: pm-test2, 192.168.1.102
- Virtual IPアドレス (VIP): 192.168.1.178
VIPが、外部へのサービス公開用IPアドレスとなります。
pm-test1 がアクティブな場合の構成図は以下のとおりです。
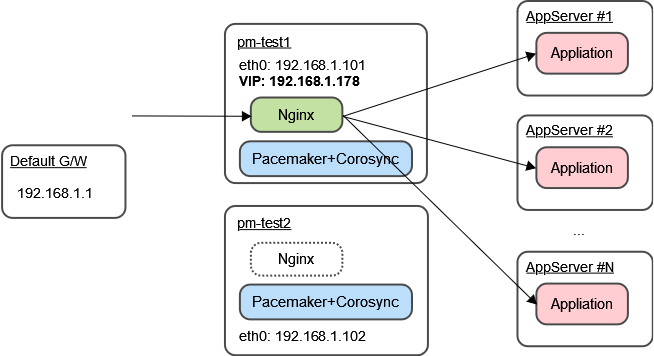
Webアクセスは、ここでは、シンプルにVirutal IPアドレス直打ちのHTTPで、http://192.168.1.178/ でアクセスできればOKとします。
本番運用では https://example.jp/ のように、FQDNのホスト名かつHTTPSでアクセスするよう設定してください。
3. 構築手順
3.1. Nginxの設定
Rocky Linux 8のリポジトリから、Nginxをインストールします。
# dnf install nginx
より新しいバージョンを使用したい場合は、Nginx公式サイトからソースをダウンロードしてビルドするか、Nginx公式リポジトリを設定し、インストールするとよいでしょう。
・nginx: Linux packages
http://nginx.org/en/linux_packages.html#RHEL
※ここでは、Nginxの設定はデフォルトままとします。本番稼働するWebサーバーでは、VirtualHostやSSLの設定などを行ってください。
ドキュメントルートにテスト用HTMLを設置します。
Virtual IPアドレスに対してWebアクセスしたときに、実際にはどちらのサーバーにアクセスしたかが確認できるよう、pm-test1, pm-test2 でそれぞれのホスト名を表示するようにします。
pm-test1の /usr/share/nginx/html/test.html
<!DOCTYPE html>
<html>
<head>
<meta charset="UTF-8" />
<title>Test Page</title>
</head>

<body>
<h1>Test Page</h1>
test page on pm-test1.
</body>
</html>
pm-test2の /usr/share/nginx/html/test.html
<!DOCTYPE html>
<html>
<head>
<meta charset="UTF-8" />
<title>Test Page</title>
</head>

<body>
<h1>Test Page</h1>
test page on pm-test2.
</body>
</html>
なお、Nginxサービスの起動・停止は、PacemakerがSystemdを介して制御してくれるので、自動起動設定(systemctl enable nginx)は不要です。
※仮に自動起動設定をしていていも、「スタンバイ」のほうのNginxはPacemakerにより強制的に停止されます。
3.2. Pacemaker+Corosyncの設定
3.2.1. PacemakerとCorosyncのインストール
3.2.2. ファイアウォール設定
3.2.3. Pacemakerの初期設定
3.2.4. Pacemakerのクラスターリソース設定
3.2.5. Pacemakerの自動起動設定
ソフトウェアPacemakerとCorosyncをインストール、設定します。
設定の前に、以下のとおり、補足します。
- pcsコマンド
Pacemakerの設定、状態確認、制御は、pcsコマンドで行います。
pcsコマンドによる制御は、冗長構成のクラスターを構成する全サーバー間で通信されるため、基本的には、Pacemakerが稼働しているいずれか1台のサーバーで実行すればよいです。
pcsコマンドの実行には、pcsdサービスが稼働している必要があります。
- ノードとリソース
Pacemakerでは、冗長構成に含まれるサーバーOSのことを、「ノード(Node)」と呼びます。
また、冗長化の制御・監視対象を「リソース(Resource)」と呼びます。
- PacemakerとCorosyncの役割
Pacemakerはクラスター制御、リソース監視および障害検出とリカバリーを担当し、Corosyncはクラスター通信層の制御、ノード死活監視を担当する。(と、僕は理解しました。)
- アクティブとスタンバイ
ここではこれ以降、Virtual IPアドレスを付与し、Nginxを起動してWebサービスを稼働させるノードの状態を「アクティブ」と呼ぶことにします。
また、アクティブではないもう1台のノードの状態を「スタンバイ」と呼ぶことにします。
3.2.1. PacemakerとCorosyncのインストール
PacemakerとCorosyncをインストールします。
pcp-zeroconf は、トラブルシュートで使用するとのこと。
Rocky Linuxでは、HighAvailability(ha)リポジトリに存在しますが、デフォルトでは無効となっているので、--enablerepo=ha で一時的に有効にして、インストールします。
 # dnf --enablerepo=ha \
    install pcs pacemaker resource-agents fence-agents-all pcp-zeroconf
haclusterユーザーが自動作成されたことを確認します。
 # id hacluster

uid=189(hacluster) gid=189(haclient) groups=189(haclient)

 # tail /etc/passwd

sssd:x:996:993:User for sssd:/:/sbin/nologin
sshd:x:74:74:Privilege-separated SSH:/var/empty/sshd:/sbin/nologin
version2:x:2000:2000::/home/version2:/bin/bash
chrony:x:995:992::/var/lib/chrony:/sbin/nologin
nginx:x:497:497::/var/cache/nginx:/sbin/nologin
pesign:x:496:496:Group for the pesign signing daemon:/run/pesign:/sbin/nologin
pcp:x:495:495:Performance Co-Pilot:/var/lib/pcp:/sbin/nologin
hacluster:x:189:189:cluster user:/home/hacluster:/sbin/nologin
rpc:x:32:32:Rpcbind Daemon:/var/lib/rpcbind:/sbin/nologin
rpcuser:x:29:29:RPC Service User:/var/lib/nfs:/sbin/nologin
Pacemakerの設定用pcsコマンドを使用するための、pcsdサービスを起動します。
あわせて、自動起動設定も行います。
 # systemctl enable --now pcsd

Created symlink /etc/systemd/system/multi-user.target.wants/pcsd.service → /usr/lib/systemd/system/pcsd.service.

 # systemctl status pcsd

● pcsd.service - PCS GUI and remote configuration interface
   Loaded: loaded (/usr/lib/systemd/system/pcsd.service; enabled; vendor preset>
   Active: active (running) since Tue 2023-04-11 06:34:41 UTC; 4s ago
     Docs: man:pcsd(8)
           man:pcs(8)
 Main PID: 22079 (pcsd)
    Tasks: 1 (limit: 4588)
   Memory: 28.1M
   CGroup: /system.slice/pcsd.service
           mq22079 /usr/libexec/platform-python -Es /usr/sbin/pcsd

Apr 11 06:34:40 pm-test1 systemd[1]: Starting PCS GUI and remote configuration >
Apr 11 06:34:41 pm-test1 systemd[1]: Started PCS GUI and remote configuration i>
3.2.2. ファイアウォール設定
2台のサーバー間で、firewalldやnftablesなど、ファイアウォールによるアクセス制御を設定している場合は、相手サーバーからの以下のポートのInbound通信を許可します。
TCP/2224 (pcsデーモンで使用)
TCP/3121 (Pacemaker Remoteノード用)
TCP/21064 (DLMリソース用)
UDP/5405 (Corosyncクラスタリング用)
UDP/5404 (Corosyncマルチキャスト用(構成されている場合))
※今回の構成では、Pacemaker Remoteノード、DLMリソース、Corosyncマルチキャストは使用していないので、TCP/3121, TCP/21064, UDP/5404は不要と思われます。
3.2.3. Pacemakerの初期設定
pcsコマンドによる設定は、2台でpcsdを起動し、ファイアウォールでアクセス許可ルールがあれば、どちらか1台で実行すればよいです。
2台のサーバーで通信して、設定をもう1台に反映してくれます。
- /etc/hosts設定
Pacemakerのクラスター設定で使用するホスト名を設定する。
 # vim /etc/hosts

192.168.1.101	pm-test1
192.168.1.102	pm-test2
- haclusterユーザーのパスワード設定
haclusterユーザーのパスワードを設定します。
このユーザー、パスワードは、のちにクラスターの認証設定で使用します。
 # passwd hacluster

<パスワード文字列を入力>
- クラスターの認証設定
クラスターに参加させるノードを認証させる。
 # pcs host auth pm-test1 pm-test2 -u hacluster

Password: // 先ほど設定した haclusterユーザーのパスワード文字列を入力

pm-test1: Authorized
pm-test2: Authorized
- クラスターの作成
pcs cluster setup コマンドで、クラスター名と、クラスター構成に組み込むノード(=サーバー)と、リンクアドレスを指定します。
なお、Pacemaker, Corosyncのドキュメントを読むと、「リンク(link)」という用語がたくさん出てきます。
具体的に説明している箇所は見つけられませんでしたが、僕は「クラスターを構成するネットワーク」と理解しました。
「リンクアドレス」は、「ノード間監視の通信で使用するIPアドレス」と考えればよいでしょうか。
リンクアドレスは、サービス用のIPアドレスとは別の監視用IPアドレス(ネットワーク)でも構いませんし、サービス用のIPアドレスと監視用IPアドレスの複数を指定しても構いません。
クラスター名は cluster01 とします。
--startオプションをつけて、設定と同時に、pacemakerサービスを起動します。
 # pcs cluster setup cluster01 --start \
    pm-test1 addr=192.168.1.101 \
    pm-test2 addr=192.168.1.102
※リンクアドレスを複数指定する場合は、ノード名の次に、addr= を複数指定します。
 # pcs cluster setup cluster01 --start \
    pm-test1 addr=192.168.1.101 addr=172.16.1.101 \
    pm-test2 addr=192.168.1.102 addr=172.16.1.102

Destroying cluster on hosts: 'pm-test1', 'pm-test2'...
pm-test2: Successfully destroyed cluster
pm-test1: Successfully destroyed cluster
Requesting remove 'pcsd settings' from 'pm-test1', 'pm-test2'
pm-test1: successful removal of the file 'pcsd settings'
pm-test2: successful removal of the file 'pcsd settings'
Sending 'corosync authkey', 'pacemaker authkey' to 'pm-test1', 'pm-test2'
pm-test1: successful distribution of the file 'corosync authkey'
pm-test1: successful distribution of the file 'pacemaker authkey'
pm-test2: successful distribution of the file 'corosync authkey'
pm-test2: successful distribution of the file 'pacemaker authkey'
Sending 'corosync.conf' to 'pm-test1', 'pm-test2'
pm-test1: successful distribution of the file 'corosync.conf'
pm-test2: successful distribution of the file 'corosync.conf'
Cluster has been successfully set up.
Starting cluster on hosts: 'pm-test1', 'pm-test2'...
↑「Cluster has been successfully set up.」と表示されればOKです。
この初期状態で、pcs status コマンドでクラスターの状態を確認します。
 # pcs status

Cluster name: cluster01

WARNINGS:
No stonith devices and stonith-enabled is not false

Status of pacemakerd: 'Pacemaker is running' (last updated 2023-04-11 16:06:02 +09:00)
Cluster Summary:
  * Stack: corosync
  * Current DC: pm-test2 (version 2.1.4-5.el8_7.2-dc6eb4362e) - partition with quorum
  * Last updated: Tue Apr 11 16:06:02 2023
  * Last change:  Tue Apr 11 16:03:42 2023 by hacluster via crmd on pm-test2
  * 2 nodes configured
  * 0 resource instances configured

Node List:
  * Online: [ pm-test1 pm-test2 ]

Full List of Resources:
  * No resources

Daemon Status:
  corosync: active/disabled
  pacemaker: active/disabled
  pcsd: active/enabled
↑「Node List:」で、「Online: [ pm-test1 pm-test2 ]」のように、ノードが Online となっていればOKです。
クラスターの管理通信(Colosyncの通信)を確認します。
「LINK ID 0」で、監視用のIPアドレス 192.168.1.x が表示されればOKです。
 # corosync-cfgtool -s

-- pm-test1
Local node ID 1, transport knet
LINK ID 0 udp
        addr    = 192.168.1.101
        status:
                nodeid:          1:     localhost
                nodeid:          2:     connected
--

-- pm-test2
Local node ID 2, transport knet
LINK ID 0 udp
        addr    = 192.168.1.102
        status:
                nodeid:          1:     connected
                nodeid:          2:     localhost
--
- クラスターパラメータの設定
Pacemakerは複数のクラスタからアクティブなノードを選出する際に、多数決によって決定します。
しかし、ノードが2台の場合は多数決による決定ができないため、以下2点の設定を行います。
現在の設定を確認します。
 # pcs property

Cluster Properties:
 cluster-infrastructure: corosync
 cluster-name: cluster01
 dc-version: 2.1.4-5.el8_7.2-dc6eb4362e
 have-watchdog: false
クォーラムの状態を無視する(ignore)設定をします。
# pcs property set no-quorum-policy=ignore
STONITHを無効とする設定をします。
# pcs property set stonith-enabled=false
再度、現在の設定を確認します。
 # pcs property

Cluster Properties:
 cluster-infrastructure: corosync
 cluster-name: cluster01
 dc-version: 2.1.4-5.el8_7.2-dc6eb4362e
 have-watchdog: false
 no-quorum-policy: ignore
 stonith-enabled: false
クォーラムやSTONITHについて補足します。
set stonith-enabled= で、クラスターがクォーラムを持っていないときの動作を定義します。
2台構成の場合は、片方が停止しても動作を続行できるよう、ignoreを指定するのが望ましいそうです。
STONITHの機能により、強制的に相手のノードを再起動(フェンシング)することで、複数のサーバーがアクティブになり、サービスが競合する不具合を防ぐことができます。
STONITH機能を使用するには、物理サーバーのハードウェアもしくは仮想マシンの管理ソフトウェアが外部からの電源ON/OFFに対応している必要があります。
今回のサーバーは対応していないため、STONITHは無効とします。
これらの設定については、末尾に記載した参考記事(6)の説明がわかりやすいです。
3.2.4. Pacemakerのクラスターリソース設定
Pacemakerによるクラスター動作の要件として、以下を考えます。
- 2台のサーバーのうちどちらかに、Virtual IPを付与し、Nginxを起動する。
- Nginxプロセスとネットワーク疎通を監視し、不具合があればもう1台のサーバーにフェイルオーバーし、Virtual IPを付与し、Nginxを起動する。
上記の要件を満たすため、以下の3つのリソース設定を行います。
1. VIP制御リソース
リソース名: rs-vip
リソースエージェント: ocf:heartbeat:IPaddr2
eth0 のインタフェースに対して、Virtual IP 192.168.1.178/24 を割り当てる。
2. Nginx制御リソース
リソース名: rs-systemd-nginx
リソースエージェント: systemd:nginx
systemdを使用してNginxサービスを起動・停止する。
3. ネットワーク監視用Pingリソース
リソース名: rs-ping-gw
リソースエージェント: ocf:pacemaker:ping
ゲートウェイに対して各サーバからPingを実行し、Ping疎通ができないサーバーではリソースを起動できないよう制約 (constraint) を設定する。
ひとつずつ設定していきます。
NginxをVirtual IPとともにフェイルオーバーさせるためのリソースグループ rg01 を作成し、--groupオプションでリソースを所属させます。
「1. VIP制御リソース」を作成します。
 # pcs resource create rs-vip ocf:heartbeat:IPaddr2 \
    ip=192.168.1.178 cidr_netmask=24 nic=eth0 --group rg01
「2. Nginx制御リソース」を作成します。
# pcs resource create rs-systemd-nginx systemd:nginx --group rg01
「3. ネットワーク監視用Pingリソース」を作成します。
まず、デフォルトゲートウェイを確認します。
 # ip r

default via 192.168.1.1 dev eth0 proto dhcp src 192.168.1.101 metric 100
192.168.1.0/24 dev eth0 proto kernel scope link src 192.168.1.101 metric 100
↑デフォルトゲートウェイは 192.168.1.1 とわかります。
ネットワーク監視は2台のノードでアクティブ/アクティブで稼働させ、常に両方のノードにてネットワークの正常性を確認させておくため、Cloneリソースとします。
 # pcs resource create rs-ping-gw ocf:pacemaker:ping \
    dampen=5s multiplier=1000 host_list=192.168.1.1

 # pcs resource clone rs-ping-gw
ロケーションの制約設定を追加します。
Pingリソースは、「pingd」という名称のパラメータを持っており、Ping成功時は1000、失敗時は0の値を返します。
pingdの値が未定義または1より小さい場合は、NginxとVirtual IPのリソースグループを起動させないというロケーション制約を定義します。
 # pcs constraint location rg01 rule score=-INFINITY \
    pingd lt 1 or not_defined pingd
ロケーションの制約設定を確認します。
 # pcs constraint

Location Constraints:
  Resource: rg01
    Constraint: location-rg01
      Rule: boolean-op=or score=-INFINITY
        Expression: pingd lt 1
        Expression: not_defined pingd
Ordering Constraints:
Colocation Constraints:
Ticket Constraints:
リソース設定を確認します。
 # pcs resource config

Group: rg01
  Resource: rs-vip (class=ocf provider=heartbeat type=IPaddr2)
    Attributes: rs-vip-instance_attributes
      cidr_netmask=24
      ip=192.168.1.178
      nic=eth0
    Operations:
      monitor: rs-vip-monitor-interval-10s
        interval=10s
        timeout=20s
      start: rs-vip-start-interval-0s
        interval=0s
        timeout=20s
      stop: rs-vip-stop-interval-0s
        interval=0s
        timeout=20s
  Resource: rs-systemd-nginx (class=systemd type=nginx)
    Operations:
      monitor: rs-systemd-nginx-monitor-interval-60
        interval=60
        timeout=100
      start: rs-systemd-nginx-start-interval-0s
        interval=0s
        timeout=100
      stop: rs-systemd-nginx-stop-interval-0s
        interval=0s
        timeout=100
Clone: rs-ping-gw-clone
  Resource: rs-ping-gw (class=ocf provider=pacemaker type=ping)
    Attributes: rs-ping-gw-instance_attributes
      dampen=5s
      host_list=192.168.1.1
      multiplier=1000
    Operations:
      monitor: rs-ping-gw-monitor-interval-10s
        interval=10s
        timeout=60s
      reload-agent: rs-ping-gw-reload-agent-interval-0s
        interval=0s
        timeout=20s
      start: rs-ping-gw-start-interval-0s
        interval=0s
        timeout=60s
      stop: rs-ping-gw-stop-interval-0s
        interval=0s
        timeout=20s
↑ここで、、
  Resource: rs-systemd-nginx (class=systemd type=nginx)
    Operations:
      monitor: rs-systemd-nginx-monitor-interval-60
        interval=60
        timeout=100
とあるので、Nginxサービスの監視は60秒間隔ですね。
pcs status コマンドでPacemakerの状態を確認します。
「Full List of Resources:」で、アクティブなノードを確認できます。
 # pcs status

Cluster name: cluster01
Status of pacemakerd: 'Pacemaker is running' (last updated 2023-04-11 16:16:10 +09:00)
Cluster Summary:
  * Stack: corosync
  * Current DC: pm-test2 (version 2.1.4-5.el8_7.2-dc6eb4362e) - partition with quorum
  * Last updated: Tue Apr 11 16:16:11 2023
  * Last change:  Tue Apr 11 16:15:42 2023 by root via cibadmin on pm-test1
  * 2 nodes configured
  * 4 resource instances configured

Node List:
  * Online: [ pm-test1 pm-test2 ]

Full List of Resources:
  * Resource Group: rg01:
    * rs-vip    (ocf::heartbeat:IPaddr2):        Started pm-test1
    * rs-systemd-nginx  (systemd:nginx):         Started pm-test1
  * Clone Set: rs-ping-gw-clone [rs-ping-gw]:
    * Started: [ pm-test1 pm-test2 ]

Daemon Status:
  corosync: active/disabled
  pacemaker: active/disabled
  pcsd: active/enabled
↑Virtual IPリソースとNginxリソースが、pm-test1 でアクティブとなっていることがわかります。
pm-test1 のNginxサービスのステータスや、/var/log/messages を確認します。
(pm-test1)
 # systemctl status nginx

● nginx.service - Cluster Controlled nginx
   Loaded: loaded (/usr/lib/systemd/system/nginx.service; disabled; vendor pres>
  Drop-In: /run/systemd/system/nginx.service.d
           mq50-pacemaker.conf
   Active: active (running) since Tue 2023-04-11 16:13:32 JST; 3min 52s ago
  Process: 3759 ExecStart=/usr/sbin/nginx (code=exited, status=0/SUCCESS)
  Process: 3756 ExecStartPre=/usr/sbin/nginx -t (code=exited, status=0/SUCCESS)
  Process: 3754 ExecStartPre=/usr/bin/rm -f /run/nginx.pid (code=exited, status>
 Main PID: 3760 (nginx)
    Tasks: 3 (limit: 4588)
   Memory: 13.4M
   CGroup: /system.slice/nginx.service
           tq3760 nginx: master process /usr/sbin/nginx
           tq3761 nginx: worker process
           mq3762 nginx: worker process

Apr 11 16:13:31 pm-test1 systemd[1]: Starting Cluster Controlled nginx...
Apr 11 16:13:32 pm-test1 nginx[3756]: nginx: the configuration file /etc/nginx/>
Apr 11 16:13:32 pm-test1 nginx[3756]: nginx: configuration file /etc/nginx/ngin>
Apr 11 16:13:32 pm-test1 systemd[1]: Started Cluster Controlled nginx.

 # less /var/log/messages

Apr 11 16:13:31 pm-test1 pacemaker-controld[3370]: notice: Requesting local exec
ution of probe operation for rs-systemd-nginx on pm-test1
Apr 11 16:13:31 pm-test1 pacemaker-controld[3370]: notice: Result of probe opera
tion for rs-systemd-nginx on pm-test1: not running (inactive)
Apr 11 16:13:31 pm-test1 pacemaker-controld[3370]: notice: Requesting local exec
ution of start operation for rs-systemd-nginx on pm-test1
Apr 11 16:13:31 pm-test1 systemd[1]: Reloading.
Apr 11 16:13:31 pm-test1 systemd[1]: /usr/lib/systemd/system/irqbalance.service:
6: Unknown lvalue 'ConditionCPUs' in section 'Unit'
Apr 11 16:13:31 pm-test1 systemd[1]: Starting Cluster Controlled nginx...
Apr 11 16:13:32 pm-test1 nginx[3756]: nginx: the configuration file /etc/nginx/nginx.conf syntax is ok
Apr 11 16:13:32 pm-test1 nginx[3756]: nginx: configuration file /etc/nginx/nginx.conf test is successful
Apr 11 16:13:32 pm-test1 systemd[1]: Started Cluster Controlled nginx.
Apr 11 16:13:33 pm-test1 pacemaker-controld[3370]: notice: Result of start operation for rs-systemd-nginx on pm-test1: ok
Apr 11 16:13:33 pm-test1 pacemaker-controld[3370]: notice: Requesting local execution of monitor operation for rs-systemd-nginx on pm-test1
Apr 11 16:13:33 pm-test1 pacemaker-controld[3370]: notice: Result of monitor operation for rs-systemd-nginx on pm-test1: ok
↑「Starting Cluster Controlled nginx…」や、/var/log/messages のログの流れから、Nginx がPacemakerにより制御されていることがわかります。
pm-test2 では、Nginx が起動していないことを確認します。
(pm-test2)
 # systemctl status nginx

● nginx.service - The nginx HTTP and reverse proxy server
   Loaded: loaded (/usr/lib/systemd/system/nginx.service; disabled; vendor pres>
   Active: inactive (dead)

 # less /var/log/messages

Apr 11 16:13:31 pm-test2 pacemaker-schedulerd[3373]: notice: Actions: Start
 rs-systemd-nginx     ( pm-test1 )
Apr 11 16:13:31 pm-test2 pacemaker-schedulerd[3373]: notice: Calculated transiti
on 4, saving inputs in /var/lib/pacemaker/pengine/pe-input-6.bz2
Apr 11 16:13:31 pm-test2 pacemaker-controld[3374]: notice: Initiating monitor op
eration rs-systemd-nginx_monitor_0 locally on pm-test2
Apr 11 16:13:31 pm-test2 pacemaker-controld[3374]: notice: Requesting local exec
ution of probe operation for rs-systemd-nginx on pm-test2
Apr 11 16:13:31 pm-test2 pacemaker-controld[3374]: notice: Initiating monitor op
eration rs-systemd-nginx_monitor_0 on pm-test1
Apr 11 16:13:31 pm-test2 pacemaker-controld[3374]: notice: Result of probe opera
tion for rs-systemd-nginx on pm-test2: not running (inactive)
Apr 11 16:13:31 pm-test2 pacemaker-controld[3374]: notice: Initiating start oper
ation rs-systemd-nginx_start_0 on pm-test1
Apr 11 16:13:33 pm-test2 pacemaker-controld[3374]: notice: Initiating monitor op
eration rs-systemd-nginx_monitor_60000 on pm-test1
Apr 11 16:13:33 pm-test2 pacemaker-controld[3374]: notice: Transition 4 (Complet
e=6, Pending=0, Fired=0, Skipped=0, Incomplete=0, Source=/var/lib/pacemaker/peng
ine/pe-input-6.bz2): Complete
Apr 11 16:13:33 pm-test2 pacemaker-controld[3374]: notice: State transition S_TR
ANSITION_ENGINE -> S_IDL
pm-test1 側で、ネットワークインタフェース eth0 に Virtual IP 192.168.1.178 が割り当てられたことを確認します。
(pm-test1)
 # ip a show

1: lo: <LOOPBACK,UP,LOWER_UP> mtu 65536 qdisc noqueue state UNKNOWN group default qlen 1000
    link/loopback 00:00:00:00:00:00 brd 00:00:00:00:00:00
    inet 127.0.0.1/8 scope host lo
       valid_lft forever preferred_lft forever
    inet6 ::1/128 scope host
       valid_lft forever preferred_lft forever
2: eth0: <BROADCAST,MULTICAST,UP,LOWER_UP> mtu 9001 qdisc mq state UP group default qlen 1000
    link/ether 0a:e6:c5:85:39:03 brd ff:ff:ff:ff:ff:ff
    altname enp0s5
    altname ens5
    inet 192.168.1.101/24 brd 192.168.1.255 scope global dynamic noprefixroute eth0
       valid_lft 2238sec preferred_lft 2238sec
    inet 192.168.1.178/24 brd 192.168.1.255 scope global secondary eth0
       valid_lft forever preferred_lft forever
    inet6 fe80::8e6:c5ff:fe85:3903/64 scope link
       valid_lft forever preferred_lft forever
Virtual IP で、Webページにアクセスしてみます。
 # curl http://192.168.1.178/test.html

<!DOCTYPE html>
<html>
<head>
<meta charset="UTF-8" />
<title>Test Page</title>
</head>

<body>
<h1>Test Page</h1>
test page on pm-test1.
</body>
</html>
↑pm-test1 のほうにアクセスしていることがわかります。
※AWS EC2の場合、Virtual IPのようなエイリアスアドレスは、ENIにもIPアドレスを設定しないと、他のサーバーからはアクセスできません。他のIaaSクラウドサーバーでも同様かもしれません。ご注意ください。
念のため、アクセスログを確認します。
(pm-test1)
 # less /var/log/nginx/access.log

192.168.1.217 - - [11/Apr/2023:16:31:03 +0900] "GET /test.html HTTP/1.1" 200 155 "-" "curl/7.61.1" "-"
3.2.5. Pacemakerの自動起動設定
pm-test1, pm-test2 の両サーバーで設定します。
(pm-test1, pm-test2)
 # systemctl enable pacemaker

Created symlink /etc/systemd/system/multi-user.target.wants/pacemaker.service → /usr/lib/systemd/system/pacemaker.service.

 # systemctl status pacemaker

● pacemaker.service - Pacemaker High Availability Cluster Manager
   Loaded: loaded (/usr/lib/systemd/system/pacemaker.service; enabled; vendor p>
   Active: active (running) since Wed 2023-04-11 18:35:00 JST; 3min 27s ago
     Docs: man:pacemakerd
           https://clusterlabs.org/pacemaker/doc/
 Main PID: 1052 (pacemakerd)
    Tasks: 10
   Memory: 39.0M
   CGroup: /system.slice/pacemaker.service
           tq1052 /usr/sbin/pacemakerd
           tq1080 /usr/libexec/pacemaker/pacemaker-based
           tq1081 /usr/libexec/pacemaker/pacemaker-fenced
           tq1082 /usr/libexec/pacemaker/pacemaker-execd
           tq1083 /usr/libexec/pacemaker/pacemaker-attrd
           tq1084 /usr/libexec/pacemaker/pacemaker-schedulerd
           tq1085 /usr/libexec/pacemaker/pacemaker-controld
           tq4478 /bin/sh /usr/lib/ocf/resource.d/pacemaker/ping monitor
           tq4495 /bin/sh /usr/lib/ocf/resource.d/pacemaker/ping monitor
           mq4496 ping -n -q -W 18 -c 3 192.168.1.1

Apr 11 18:35:26 pm-test1 pacemaker-controld[1085]:  notice: Requesting local ex>
Apr 11 18:35:28 pm-test1 pacemaker-controld[1085]:  notice: Result of monitor o>
Apr 11 18:35:31 pm-test1 pacemaker-controld[1085]:  notice: Requesting local ex>
Apr 11 18:35:31 pm-test1 pacemaker-controld[1085]:  notice: Result of start ope>
Apr 11 18:35:31 pm-test1 pacemaker-controld[1085]:  notice: Requesting local ex>
Apr 11 18:35:31 pm-test1 pacemaker-controld[1085]:  notice: Requesting local ex>
Apr 11 18:35:31 pm-test1 pacemaker-controld[1085]:  notice: Result of monitor o>
Apr 11 18:35:33 pm-test1 pacemaker-controld[1085]:  notice: Result of start ope>
Apr 11 18:35:33 pm-test1 pacemaker-controld[1085]:  notice: Requesting local ex>
Apr 11 18:35:33 pm-test1 pacemaker-controld[1085]:  notice: Result of monitor o
前編の、Pacemakerの設定と、正常系の動作確認としては、ここまでで完了です。
後編では、とくに運用面の、Packmakerの動作や自動/手動フェイルオーバーなどについて記載します。
(参考記事)
(1) NGINXの負荷分散装置をPacemakerで冗長化する – 技術メモメモ
https://tech-mmmm.blogspot.com/2022/06/nginxpacemaker.html
(2) CentOS 8 + PacemakerでSquidとUnboundを冗長化する – 技術メモメモ
https://tech-mmmm.blogspot.com/2020/07/centos-8-pacemakersquidunbound.html
(3) 技術メモメモ ラベル:Pacemaker – 技術メモメモ
https://tech-mmmm.blogspot.com/search/label/Pacemaker
(4) 高可用性クラスタリングの設定 Oracle Linux Help Center
https://docs.oracle.com/cd/F22978_01/availability/availability-InstallingandConfiguringPacemakerandCorosync.html
(5) 高可用性クラスターの設定および管理 – A Red Hat training course is available for RHEL 8
https://access.redhat.com/documentation/ja-jp/red_hat_enterprise_linux/8/html/configuring_and_managing_high_availability_clusters/index
(6) 【Pacemaker】HAクラスタの運用で注意すべき「スプリットブレイン」とは? – ラクスエンジニアブログ
https://tech-blog.rakus.co.jp/entry/20220302/pacemaker
(7) pcs Man Page – ManKier
https://www.mankier.com/8/pcs
(8) Pacemakerの概要 – Linux-HA Japan
https://linux-ha.osdn.jp/wp/manual/pacemaker_outline
(9) Pacemaker/Corosync の設定値について – SRA OSS Tech Blog
https://www.sraoss.co.jp/tech-blog/pacemaker/pacemaker-config-values/
(10) Pacemaker Explained 4. Cluster Resources
https://clusterlabs.org/pacemaker/doc/2.1/Pacemaker_Explained/html/resources.html
(11) クラスタ構成ソフトウェア「Pacemaker」と「Heartbeat」「Corosync」の関係性 – ビジネス継続とITについて考える
https://bcblog.sios.jp/drbd-pacemaker-heartbeat-corosync/